- All Products
- Shop by Brands
- BW Technologies
- BW Technologies
- BW Technologies Monitors
- Models
- BW Clip
- BW Clip4
- GasAlertClip Extreme
- GasAlert Extreme
- GasAlertMicroClip XT
- GasAlertMicroClip XL
- GasAlertMicroClip X3
- GasAlertQuattro
- GasAlertMax XT II
- GasAlertMicro 5 Series
- SamplerPak
- IntelliDox Docking System
- MicroDock II
- BW Ultra
- BW Solo
- Gas Monitors
- Gas Monitor Manufacturers
- BW Technologies
- Bacharach
- Biosystems
- Crowcon
- Draeger
- Gas Clip Technologies
- GfG Instruments
- GMI/Detcon
- Honeywell Analytics
- Industrial Scientific
- IGD
- mPower
- MSA
- RAE Instruments
- RKI Instruments
- WatchGas
- Gas Monitor Categories
- Single-Gas Monitors
- Multi-Gas Monitors
- Zero Maintenance Monitors
- Fixed System Gas Monitors
- Confined Space Kits
- Wireless Fixed Point Gas Detectors
- Hydrogen Sulfide (H2S) Monitors
- Calibration Gas
- Combustion Analyzers
- Water Quality
- Reliability Instruments
- Refractometers
- HVAC
- Weather
- Temperature
- Laboratory
- Sound
- IAQ
- Electrical
- All Categories


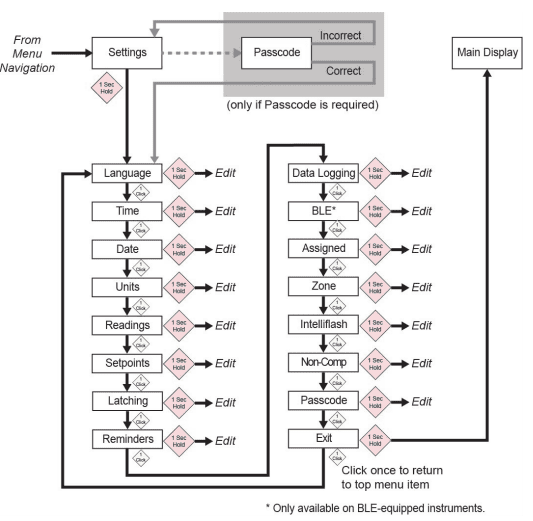
Navigation: Settings
9. Navigation: Settings
The menu in Settings provides access to adjust settings. It has the following submenus:
- Language
- Time*
- Date*
- Units
- Readings
- Setpoints
- Latching
- Reminders
- Data Log*
- BLE (wireless versions only)*
- Assigned*
- Zone*
- IntelliFlash
- Non-compliance
- Passcode
- Exit
* Not included on the BW Solo Lite version. Also, the Mute function under Latching is not included on the BW Solo Lite.
9.1. Enter Settings Mode
Note:A passcode can be required to access the settings menu. Setting an access restriction can be done using the Passcode submenu or by using an IntelliDoX with SafetySuite software.
To enter Settings from the main reading screen:
- Press the button twice in rapid succession. You should see �>Information�
- Press the button again, four times, to reach �>Settings�.
- Press and hold the button for 1 second. You should see �>Language�. This is the first editable setting.
Note: If a passcode is required, input the 4-digit passcode (see section 9.17 for details). The instrument does not have this feature enabled out of the box.
9.2. Menus & Submenus In Settings Mode
Each Settings menu has a submenu of editable settings. All are accessed, changed, and saved in the same way:
1. Press the button once to step from one setting to the next
2. When you find a setting to edit, hold the button for 1 second. The submenu for that setting is shown.
3. Press the button once to step from one menu option to the next.
4. When you find the option you want to select, press and hold the button.
9.3. Language
English is the default language, but other languages can also be selected for the instrument. You can select any of the languages for viewing onscreen information. Navigate to a language and press the button for 1 second to select it.
Note:Language is initially set up during the out-of-the-box power-on sequence, but it can be changed at any time.
9.4. Time
Time can be in 12- or 24-hour format. The default is 24-hour format.
- Changing the time format to 12-hour adds an indicator of AM or PM.
- Single digits have a �0� prefix (for example, 01:15, 02:30, etc.)
- Click to cycle through the digits
- Press the button for 1 second to select it.
9.5. Date
The date can be shown in these formats (the default is MM.DD.YYYY):
- DD.MM.YYYY (Day.Month.Year)
- MM.DD.YYYY (Month.Day.Year)
- YYYY.MM.DD (Year.Month.Day)
- Single digits have a �0� prefix (for example, 01, 02, etc.).
- When entering the year, it loops in a range from 2018 to 2099 before returning to 2080.
- Press the button for 1 second to select each digit.
9.6. Units
The units of measure can be set as either ppm (parts per million), mg/m3 (milligrams per cubic meter), �mol/mol (micromoles per mole), or other units appropriate to the sensor in use.
9.7. Readings
Reset the TWA and STEL readings here. Also, enable/disable Peak reading reset and perform action.
Note: The default value for the Peak reading is �disabled.� If it is enabled, there is an extra menu option that allows resetting the peak reading. If it is disabled, this menu option is hidden.
9.8. Setpoints
In Setpoints, you can assign setpoints for low alarm, high alarm, TWA, and STEL.
- Range entry is assigned four digits and two decimal places
- Range entry is limited between 0000.01 and 9999.99 (determined by gas type).
- Number entry loops through a cycle from 0 to 9 (the range entry limit determines the loop for first digit entry and subsequent digits if the maximum is assigned).
- Press once to cycle through digits.
- Hold the button down for 1 second for confirmation to set each digit within the string.
9.9. Latching
The latch alarm option ensures that an alarm persists until it is acknowledged by the user. If enabled, during an alarm condition the latched alarms option causes the low and high gas alarms (audible, visible, and vibrator)to persist until the gas concentration is below the alarm setpoint and the alarms have been acknowledged by pressing the button
You can turn latching on or off, and turn the mute option on or off. When the mute option is on, there is no sound when an alarm is latched. When latching is on and mute is off, if the instrument is still in a hazardous atmosphere, the real-time alarm will be displayed. When latching is on and mute is off, and the instrument is in a safe atmosphere, only the last gas alarm is displayed.
If the instrument is not in a hazardous atmosphere and you press the button to acknowledge, the latching alarm shuts off.
Besides turning latching on and off, you can turn the alarm mute on or off. Note: If latching the alarm is off, the option to �Mute� is hidden in the menu cycle.
The default setting for latching the alarm is off.
9.10.Reminders
Turn alert and force on or off, and set alert interval (in days) for bump and calibration
Two separate menus are included for bump and calibration, and setting the interval. The �Interval� duration is set as day, and the maximum interval is 365 days. Setting the �Interval� range to 000 days turns the �Alert� feature off and hides the �Interval� setting.
- Click to cycle through �Interval� digits
- Press for 1 second to confirm and set each digit of the �Interval� string
- Press and hold the button for 3 seconds to confirm and toggle all reminder alerts to �off.�
- Press the button for 1 second for all other toggle cycle interactions, including turning the �Alert� reminder on.
9.10.1. Force On or Off for Bump/Cal
9.10.1.1.Force Cal
When this feature is enabled, the display reads �Cal Now.� The user cannot pass this screen without calibration either manually or through IntelliDoX before proceeding to Idle Screen.
For Manual Calibration:At the �Cal Now� screen, press and hold the button to begin the process. Follow the calibration instructions. Once the Calibration has passed, the user may proceed to the idle screen. If calibration fails, then the instrument will revert to the �Cal Now� screen.
9.10.1.2.Force Bump
When this feature is enabled, the display reads �Bump Now.� The user cannot pass this screen without bump testing either manually or through IntelliDoX before proceeding to Idle Screen.
For Manual Calibraion:Press and hold the button to start the bump process. Follow the instructions for the bump process. Once the bump test has passed, the user may proceed to the idle screen. If the bump test fails, then the instrument will revert to the �Bump Now� screen. If no action is taken, then the unit will automatically shut off after 60 seconds.
The default setting for bump and calibration reminders is off.
9.11.Data Logging
Turn datalogging on or off and set the frequency interval (in seconds) for data collection
Note:Turning data logging off hides the �Interval� setting option. The default setting for �Interval� is 005 seconds, and the interval can be set between 001 and 300 seconds.
The default setting for data logging is on.
9.12.BLE
On instruments that feature BLE (Bluetooth Low Energy), turn BLE communication on or off, so that the instrument is discoverable or not discoverable.
Note:: If BLE operation is desired, this option must be specified at time of order
- When BLE is turned off, the BLE �off� icon is displayed
- When BLE is turned on, the BLE �on� icon is displayed.g
The default setting for BLE is on.
9.13.Assigned
The instrument can be assigned to a person, and their name can be programmed into it. You can also turn assignment on or off, or edit/rename an assignment. The name can be up to 10 characters long.
The following are available for entry:
- Digits 0 to 9
- Upper-case characters A to Z
- A space
9.14.Zone
A zone�s name can be programmed. You can turn location on or off, and name, edit, or rename it.
The following are available for entry:
- Digits 0 to 9
- Upper-case characters A to Z
- A space
9.15.IntelliFlash
IntelliFlash verifies operation and compliance by flashing the green LED on the top of the instrument at intervals you select. This indicator notifies you that the monitor has no fault conditions and that all required maintenance, such as bump test and calibration, has been performed.
You can turn IntelliFlash on or off. You can also turn the �beep� on or off and set the flash interval as 10, 30, or 60 seconds.
The default setting for IntelliFlash is off. The default interval is 30 seconds.
9.16.Non-Compliance Indicator LEDs
Non-Compliance is a user-settable option that flashes the red Non-Compliance Indicator LEDs around the perimeter when the instrument experiences the following.
- Gas Event
- Bump Due
- Calibration Due
Non-Compliance Indicator LEDs automatically come on, regardless of user configuration, for the following.
- Sensor Error
- Battery Error
- Calibration Error
Non-Compliance Indicator LEDs are designed to alert other people around the user that their unit is not in compliance. Users are also allowed to change the flash interval and initiate the audible seconds (10, 30, or 60 seconds). You can turn this indicator on or off for gas events, bump due, and calibration due. You can also turn �beep� on or off and set the interval (10, 30, or 60 seconds).
The default setting for the Non-Compliance feature is off. The default interval is 30 seconds.
1. The non-compliance setting is designed to alert the safety manager to acknowledge the gas event and remind them to download the data to check what happened.
2. Non-compliance events consist of Low, High, TWA, STEL, Negative, and Over Range status.
3. Gas event of non-compliance can be turned on or off.
4. When a gas alarm is dismissed, non-compliance indication will continue to indicate a gas event by non-compliance indication (flash or flash and chirp/10, 30 or 60 seconds).
5. When a gas alarm is dismissed, if latching alarm is turned on, the instrument will continue to alert alarm behavior (audible, visible, and vibration, once per second). After the button is pressed to acknowledge the latching alarm, if Gas Event in non-compliance settings is on, the instrument will continue to indicate a gas event
6. Inserting the instrument in an IntelliDoX will clear the non-compliance indication (for gas event). Any time the instrument is inserted in an IntelliDoX, the event log should be recorded in the IntelliDoX. A manual bump test should clear the non-compliance indication for both gas event and bump test due. Also, a manual calibration should clear the NCI for both gas event and calibration due.
9.17.Passcode
By default, no passcode is required for access to the instrument�s settings. However, a 4-digit passcode can be set, which will prevent access to all settings. This can be set here or through Honeywell SafetySuite software. If a passcode is ever lost and the instrument cannot be accessed, contact Technical Support.
- Click once to advance the number (0, 1, 2, 3, etc.)
- Press and hold the button for 1 second to advance to the next digit.
- When the last digit is reached, press and hold the button for 1 second.
- Confirm by clicking the button once.
Important!If you forget your passcode, then contact Honeywell Technical Support.
9.18.Exit
Exit to the main menu