- All Products
- Shop by Brands
- BW Technologies
- BW Technologies
- BW Technologies Monitors
- Models
- BW Clip
- BW Clip4
- GasAlertClip Extreme
- GasAlert Extreme
- GasAlertMicroClip XT
- GasAlertMicroClip XL
- GasAlertMicroClip X3
- GasAlertQuattro
- GasAlertMax XT II
- GasAlertMicro 5 Series
- SamplerPak
- IntelliDox Docking System
- MicroDock II
- BW Ultra
- BW Solo
- Gas Monitors
- Gas Monitor Manufacturers
- BW Technologies
- Bacharach
- Biosystems
- Crowcon
- Draeger
- Gas Clip Technologies
- GfG Instruments
- GMI/Detcon
- Honeywell Analytics
- Industrial Scientific
- IGD
- mPower
- MSA
- RAE Instruments
- RKI Instruments
- WatchGas
- Gas Monitor Categories
- Single-Gas Monitors
- Multi-Gas Monitors
- Zero Maintenance Monitors
- Fixed System Gas Monitors
- Confined Space Kits
- Wireless Fixed Point Gas Detectors
- Hydrogen Sulfide (H2S) Monitors
- Calibration Gas
- Combustion Analyzers
- Water Quality
- Reliability Instruments
- Refractometers
- HVAC
- Weather
- Temperature
- Laboratory
- Sound
- IAQ
- Electrical
- All Categories


Standard Contents, User Interface and Display
1. Standard Contents
Standard Package includes:
- Detector complete with specified sensor, stainless-steel alligator clip and concussion-proof housing
- Test Cap with 1 ft of hose
- Quick Reference Guide
2. General Information
Honeywell BW Solo is easy to operate � even if you�re wearing gloves. Using this button or the Honeywell SafetySuite Device Configurator software, you can easily configure set points, latching alarms, and other parameters. You can also access measurements for short-term exposure limit (STEL) and time-weighted average (TWA), and pair the wireless Honeywell BW Solo with our mobile apps:
- With the Device Configurator app, you can set up the detector, choose alarm set points and more � all from up to 6 meters away. Also use the app to see calibration readings, email calibration certificates and upgrade firmware.
- With the Safety Communicator app, detector readings are sent instantly to Honeywell�s realtime monitoring software. Access it from any device with an internet connection, and get remote visibility on worker safety and location.
You can also use the wireless Honeywell BW Solo to share gas data with the desktop software � no dock required.
Key Features
- Simple one-button operation
- Easy sensor, filter, and battery replacement
- Compatible with IntelliDoX for centralized data with automated bump testing, calibration, and instrument management.
- Option to activate IntelliFlash� or non-compliance flash
- Ability to assign detectors to workers and locations
- Easy-to-read display for multiple languages
- Data logging with rolling 24-hour peak reading
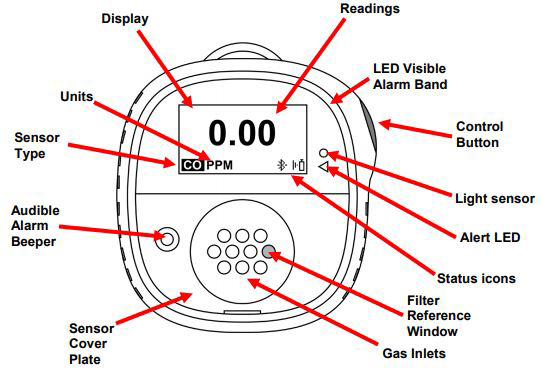
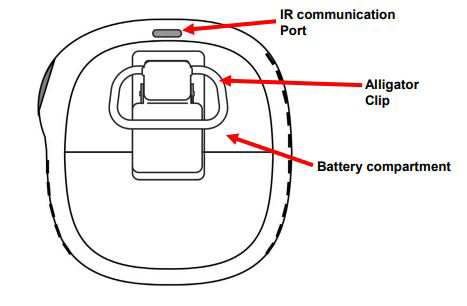
3. User Interface & Display Overview
The BW Solo has a single button for on/off, parameter viewing, and programming functions. The display is backlit when you press the button.
Front
Back
3.1. Out-Of-Box Experience (First Time Use Only)
The first time the instrument is turned on, you are prompted to select a display language and to enter time and date.
Note: Language selection during the first power-on is mandatory.
Note: : If you do not press a button for 6 seconds during out-of-the-box power-on, the instrument automatically turns off. Language selection during the first power-on is mandatory, although you can skip the time and date. If a language was selected before this 6-second idle period, the instrument shows the normal reading screen after the next start-up. If a language has not been selected, then the next time the instrument is turned on, there is a prompt to select a language.
Press and hold the button for 3 seconds. When you power the unit on, it counts down, 3-2-1. LEDs flash, the vibration alarm shakes, and the audible alarm sounds, and the Honeywell logo then appears on the screen. After startup, the �Set language� screen is shown.
Step through the available languages by pressing the button. Once you see the language you want, press and hold the button for 1 second.
Note: If you pass the language you want, press the button until your language is shown. Then press and hold the button for 1 second.
Once you have set the language, wait 3 seconds, and the �Set time� screen is shown.
Press and hold the button for 1 second to set the time. Otherwise, press it once to change to �No.� Then press the button for 1 second to advance to �Set date.� If you change your mind and want to set the time, press the button once instead.
Set the hour (00 to 23) by pressing the button until you reach the correct hour. Once the hour is selected, press and hold the button for 1 second.
When �Set minute� is shown, press the button repeatedly to reach the correct minute (00 through 59). Then press and hold the button for 1 second. The time is now set.
IMPORTANT!
If a major error that prevents the instrument from functioning is found during startup, an error number is shown on the display. Shut off the instrument and restart it. If the error message is shown again, shut off the instrument and contact Technical Services.
3.2. Status Indicator Icons
On-screen icons are used to indicate battery, bump, calibration and sensor status, as well as peak reading. The table below details how and when each icon is displayed. The triangular red LED located to the right of the screen illuminates to accompany these (it is active when the noncompliance feature is on).
| Icon | Explanation |
|---|---|
The battery icon is not shown on the display unless the remaining power is one day or less.
|
|
| When less than 12 hours remains before a bump test should be performed, this icon is shown and the buzzer sounds once every hour. When the user has also set the non-compliance option for the bump test reminder, the instrument beeps once every 10/30/60 seconds (the interval is set by the user). The icon blinks once per second if there is a failed or skipped bump test, and the instrument beeps three times every 60 minutes. A bump test is required (and indicated by this icon) if:
Failed bump test notification is shown on the screen if a bump test is failed. In the information menu, it shows that the bump test must be performed �NOW.� Note: the sensor should be challenged on a regular basis (before each day�s use) to ensure proper sensor performance. |
|
| This icon is shown when there is less than 12 hours remaining before a calibration should be performed. The instrument beeps once every 60 minutes. The icon blinks once per second if there is a failed or skipped calibration, and the instrument beeps three times every hour if the non-compliance option is on. When the user has also set the non-compliance option for the calibration reminder, the instrument beeps once every 10/30/60 seconds (the interval is set by the user). Calibration is required (and indicated by this icon) if:
|
|
| When a sensor fails, has been removed, or has expired, this icon is shown on the display, and there are is one beep per second. Stepping through the status screens, you see the fault details. | |
| The Peak Reading icon is displayed when a peak gas reading has been detected in the past 24 hours. The icon is otherwise hidden. |