- All Products
- Shop by Brands
- BW Technologies
- BW Technologies
- BW Technologies Monitors
- Models
- BW Clip
- BW Clip4
- GasAlertClip Extreme
- GasAlert Extreme
- GasAlertMicroClip XT
- GasAlertMicroClip XL
- GasAlertMicroClip X3
- GasAlertQuattro
- GasAlertMax XT II
- GasAlertMicro 5 Series
- SamplerPak
- IntelliDox Docking System
- MicroDock II
- BW Ultra
- BW Solo
- Gas Monitors
- Gas Monitor Manufacturers
- BW Technologies
- Bacharach
- Biosystems
- Crowcon
- Draeger
- Gas Clip Technologies
- GfG Instruments
- GMI/Detcon
- Honeywell Analytics
- Industrial Scientific
- IGD
- mPower
- MSA
- RAE Instruments
- RKI Instruments
- WatchGas
- Gas Monitor Categories
- Single-Gas Monitors
- Multi-Gas Monitors
- Zero Maintenance Monitors
- Fixed System Gas Monitors
- Confined Space Kits
- Wireless Fixed Point Gas Detectors
- Hydrogen Sulfide (H2S) Monitors
- Calibration Gas
- Combustion Analyzers
- Water Quality
- Reliability Instruments
- Refractometers
- HVAC
- Weather
- Temperature
- Laboratory
- Sound
- IAQ
- Electrical
- All Categories


Connect the Module to a Network
Connect the Module to a Network
Individual modules and gangs of up to 5 connected modules may be connected to a computer network via an Ethernet cable. Gangs of up to 5 modules share one network connection. Each individual or connected module requires a unique and separate IP address.
You can manage network settings through an internet browser window or via FleetManager II software. When modules are connected to a network, you may use Fleet Manager II software to update firmware, reconfigure modules and detectors, manage datalog transfers, and automate certain administrative functions.
To improve performance, BW Technologies recommends that you assign a static IP address to each networked module.
To improve security, BW Technologies recommends that you change the password for each networked module.
Before you Begin
1. Verify that you have access to one active network port for each module or gang of up to 5 connected modules. Network ports are usually managed by a network administrator. For more information, contact your network administrator or Help Desk.
2. Have ready one static IP address for each individual or connected module. Static IP addresses are usually provided by a network administrator. For more information, contact your network administrator or Help Desk.
3. Have ready one Ethernet cable for each module or gang of up to 5 connected modules.
4. Verify that the power supply is connected and the module is activated.
5. Verify that you have access to a networked computer that is part of the same network as the module.
Connecting the Module to a Network
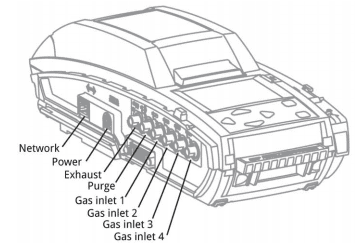
Insert one end of the Ethernet cable into the Ethernet port on the module. Insert the free end of the Ethernet cable into the network outlet. When the module is connected to the network, the network symbol is displayed at the top right corner of the LCD.
If the network symbol is not displayed within several seconds, then follow these steps:
1. Verify that the module is activated.
2. Verify that one end of the Ethernet cable is fully inserted into the Ethernet port on the module, and then verify that the free end is fully inserted into an active network outlet.
3. Press and hold until the Adjust docking station settings menu is displayed. Press
 or
or to scroll to About, and then press to display the About screen. If the IP address displays only zeroes, then the connection is not active.
If problems persist, contact your network administrator or Help Desk.
Managing Network Settings through an Internet Browser
You can change network settings and the administrative password for networked modules through an internet browser. To improve performance, BW Technologies recommends that you assign a static IP address to each networked module. To improve security, BW Technologies recommends that you change the password for each networked module.
Default User Name and Password for Internet Browser Access
The user name and password are case sensitive. BW Technologies recommends that you change the password for each networked module
- The default user name is admin.
- The default password is admin.
Changing Network Settings and Password through an Internet Browser Window
1. When the module is successfully connected to a network, display the About summary screen, and then record the IP address for the module. To display the About summary screen, follow these steps:
1. Press and holduntil the Adjust docking station settings menu is displayed.
Pressorto scroll to About, and then press to display the About screen.
2. From a networked computer, open an internet browser window. In the address bar of the internet browser window, type http:// followed by the IP address of the module.
The IntelliDoX Login webpage is displayed in the browser window.
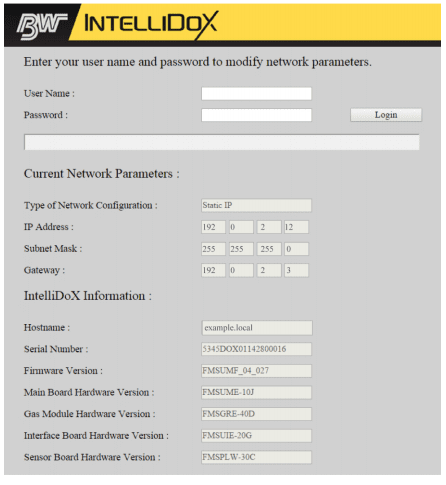
3. Type the user name and password in the text boxes provided, and then click Login. The Enter Your Network Parameters webpage is displayed in the browser window.
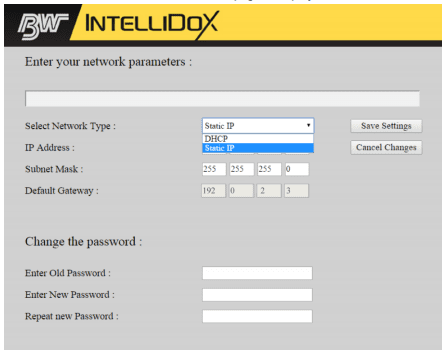
4. Change the Select Network Type to Static IP, and then type a unique IP address. Unique IP addresses are usually provided by a network administrator or Help Desk. For more information, contact your network administrator or Help Desk.
5. To change the password, type the old password. Type a new password, and then type the new password again. Click Save to save your settings and return to the IntelliDoX Login webpage, or click Cancel Changes to abandon the changes and return to the IntelliDoX Login webpage.
6. Close the browser window, or type a different IP address in the browser address bar to change network settings for another module
Managing Network Settings through Fleet Manager II Software
When you log in to Fleet Manager II software as an administrative user, you can change network settings and the administrative password for networked modules. For more information, refer to the Fleet Manager II operator manual.