- All Products
- Shop by Brands
- BW Technologies
- BW Technologies
- BW Technologies Monitors
- Models
- BW Clip
- BW Clip4
- GasAlertClip Extreme
- GasAlert Extreme
- GasAlertMicroClip XT
- GasAlertMicroClip XL
- GasAlertMicroClip X3
- GasAlertQuattro
- GasAlertMax XT II
- GasAlertMicro 5 Series
- SamplerPak
- IntelliDox Docking System
- MicroDock II
- BW Ultra
- BW Solo
- Gas Monitors
- Gas Monitor Manufacturers
- BW Technologies
- Bacharach
- Biosystems
- Crowcon
- Draeger
- Gas Clip Technologies
- GfG Instruments
- GMI/Detcon
- Honeywell Analytics
- Industrial Scientific
- IGD
- mPower
- MSA
- RAE Instruments
- RKI Instruments
- WatchGas
- Gas Monitor Categories
- Single-Gas Monitors
- Multi-Gas Monitors
- Zero Maintenance Monitors
- Fixed System Gas Monitors
- Confined Space Kits
- Wireless Fixed Point Gas Detectors
- Hydrogen Sulfide (H2S) Monitors
- Calibration Gas
- Combustion Analyzers
- Water Quality
- Reliability Instruments
- Refractometers
- HVAC
- Weather
- Temperature
- Laboratory
- Sound
- IAQ
- Electrical
- All Categories


Configure Module and Detector Settings
Configure Module and Detector Settings
Certain features, options and settings for the module and/or compatible detectors can be configured through Fleet Manager II software. You must use Fleet Manager II software to create a configuration file that is compatible with the module. After the configuration file is created, transfer it to one or more modules to implement the new configuration settings. For more information, refer to the Fleet Manager II operator manual and the appropriate detector operator manual.
Workflow: Configuring Settings
1. Create the configuration file.
2. Transfer the configuration file to one or more modules via Fleet Manager II software
or via USB flash drive
3. Transfer configuration settings to a detector.
Creating a Configuration File via Fleet Manager II
1. Start Fleet Manager II software, and then log in as an administrator
2. Select Configure Devices via IntelliDoX on the Devices menu. The IntelliDoX Configuration Selection dialog box is displayed.
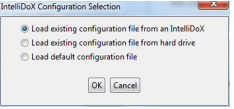
3. Select a configuration file and click OK. The IntelliDoX Device Configuration dialog box is displayed.
4. Select the tab for a compatible detector, and then select the detector configuration tab. Modify the available detector features, options and settings as required. For more information, refer to the Fleet Manager II operator manual and the appropriate detector operator manual.
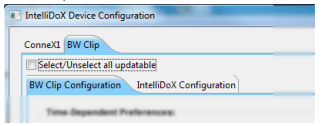
5. Select the IntelliDoX Configuration tab. Modify the available features, options and settings as required. For more information, refer to the Fleet Manager II operator manual and the appropriate detector operator manual.
6. Transfer the configuration settings to one or more modules via Fleet Manager II or USB flash drive. For more information, refer to:
1. Transferring the Configuration File to a Module via Fleet Manager II on page 59.
2. Transferring the Configuration File to a Module via USB Flash Drive on page 60.
7. Save the configuration file to PC or network folder, if necessary
Transferring the Configuration File to a Module via Fleet Manager II
1. Create the configuration file. See Configure Module and Detector Settings on page
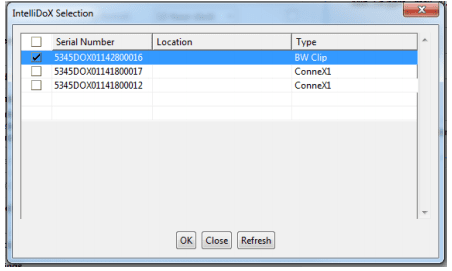
2. Click Save to IntelliDoX. The IntelliDoX Selection dialog box is displayed. Select one or more modules, and then click OK to transfer the configuration file to the selected modules.
 3. After the file is transferred, the Operation completed message box is displayed. Click OK to return to the IntelliDoX Device Configuration dialog box.
4. Verify that the configuration settings are updated on the selected modules.
1. Start Fleet Manager II software, and then log in as an administrator
2. Select Configure Devices via IntelliDoX on the Devices menu. The IntelliDoX Configuration Selection dialog box is displayed.
3. Select Load existing configuration file from an IntelliDoX. The IntelliDoX Selection dialog box is displayed.
4. Select a module and then click OK. The Retrieving from IntelliDoXprogress screen is displayed.

5. After the settings are retrieved, the IntelliDoX Device Configuration dialog box is displayed. The serial number of the selected module is appended to the dialog box title bar.
6. Verify that the configuration settings are updated.
5. Repeat steps 3 through 6 until configuration settings are verified for all modules.
Transferring the Configuration File to a Module via USB Flash Drive
For connected modules, transfer the configuration file to each appropriate module in the gang.
1. Insert a USB flash drive into a USB port on your PC. Use Windows Explorer or My Computer to open the USB flash drive, and then create a new folder named System
2. Create the configuration file. See Creating a Configuration File via Fleet Manager II on page 58
3. Click Save to File. The Save Settings to File dialog box is displayed.
4. Save the configuration file to the System folder on the USB flash drive. Do not change the file name or extension. Eject the USB flash drive from the PC.
5. Insert the USB flash drive into the USB port on the module. The USB File Copy Utility menu is displayed. Press or
or to select Copy to dock and then press
 to
continue.
to
continue.
6. The LCD changes to yellow. A progress bar and alternating Do not remove stickand USB transfer in progress messages are displayed while the file is transferred.
7. After the transfer is successfully completed, the LCD changes to blue and the USB File Copy Utility menu is displayed. Pressorto select Exit and then pressto continue.
8. The LCD changes to green. Remove the USB flash drive from the port when prompted.
Transferring Configuration Settings to a Detector
1. Insert a compatible detector into the module. Detector identification is displayed on the LCD.
2. If the detector is configured to update settings on insertion, then the detector settings are updated automatically after the detector is recognized.
3. After the configuration update is completed, other procedures specified to occur on insert are performed.
4. After all procedures are performed, remove the detector from the module and verify that the configuration settings are updated. For more information, refer to the appropriate detector operator manual.